Henna has always been a symbol of beauty, tradition, and creativity. Whether you’re preparing for a festive event, a wedding, or just want to try something new, easy hand henna designs are the perfect way to express your style. With simple patterns, minimal effort, and beautiful results, anyone can create mesmerizing designs right at home.
What Is Easy Hand Henna?
Easy hand henna refers to simple and quick designs that can be applied without much professional experience. These patterns often feature minimal detailing, repetitive motifs, and clean lines that highlight the natural shape of the hand.
Henna, also known as mehndi, is made from the powdered leaves of the henna plant (Lawsonia inermis). When mixed with water, lemon juice, or essential oils, it forms a smooth paste that stains the skin with a rich reddish-brown hue.
What makes easy hand henna special is its simplicity you don’t need to be an artist to make your hands look gorgeous. With a few basic techniques, you can create elegant designs for any occasion.
Why Choose Easy Hand Henna Designs?
Choosing easy hand henna designs isn’t just about simplicity it’s about style, convenience, and expression. Here are a few reasons why these designs are so popular:
1. Perfect for Beginners
Easy designs are a great starting point if you’re new to henna art. They allow you to practice control, balance, and spacing before moving on to complex patterns.
2. Time-Saving Beauty
Unlike heavy bridal mehndi that can take hours, easy hand henna designs can be done in minutes. Ideal for busy schedules or spontaneous celebrations.
3. Modern and Minimal
Minimalistic henna is a growing trend. It matches well with both traditional and modern outfits, giving your hands a graceful touch without being too elaborate.
4. Great for Every Occasion
From Eid and Diwali to weddings or casual gatherings, easy hand henna fits every vibe. You can even apply them just for fun or self-expression.
Popular Easy Hand Henna Styles
There are countless ways to create stunning hand henna patterns, but certain styles are timeless. Here are some of the most loved and easy-to-create options:
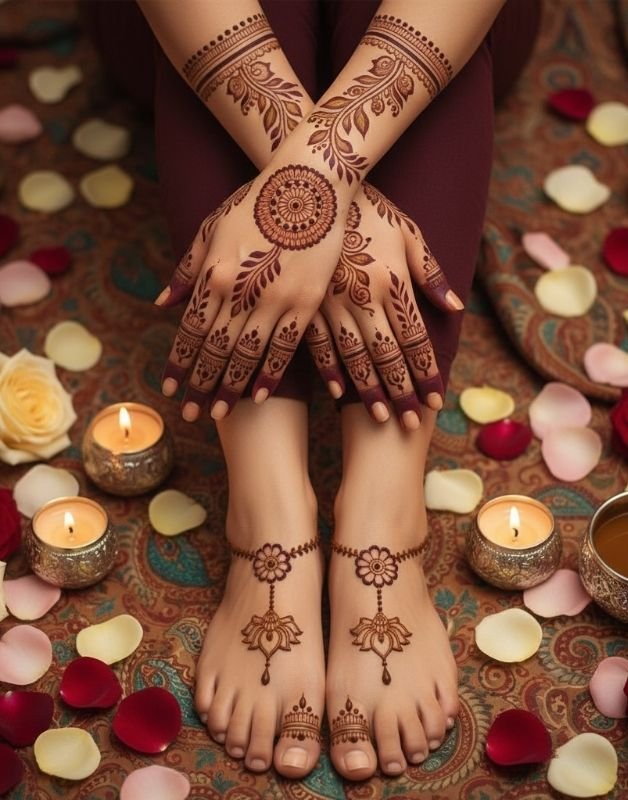
1. Floral Henna Designs
Floral patterns are classic and elegant. Start with small flowers and connect them with vines or dots. This style works beautifully on both the front and back of the hand.
Tip: Use circular petals and simple leaf shapes to maintain symmetry.
2. Mandala Designs
Mandala-inspired designs start from a circle at the center of the palm and spread outwards. They symbolize unity, peace, and balance.
Tip: Keep your mandala small and add dots or spirals around it for an easy, clean look.
3. Finger Tip Patterns
If you want something super quick, decorate only your fingers. Use rings, dots, or leafy chains around your fingertips.
Tip: Leave negative space between designs for a trendy, modern effect.
4. Bracelet or Bangle Style
This style looks like jewelry drawn with henna. Create a band around your wrist and connect it to a central pattern on your palm or backhand.
Tip: Try thin lines and spaced dots to make it look delicate.
5. Minimal Arabic Designs
Arabic-style henna is known for its bold, flowing lines and floral shapes. Simplify it by using one main flower and connecting leaves that flow diagonally across your hand.
Tip: Use a cone with a fine tip for smooth curves and clean edges.
Simple Back Hand Henna Ideas
Back-hand henna is perfect for beginners because it’s easy to apply and showcases the design beautifully.
1. Chain Patterns
Draw small flower chains from the wrist to the ring finger. It gives a bracelet-like appearance.
2. Diagonal Trails
Start from one side of the wrist and move toward the index finger. This layout makes the hand look elegant and longer.
3. Dot Work and Leaves
Mix tiny dots, leaves, and vines. This is a great way to fill empty spaces while keeping the look simple.
4. Net or Mesh Design
You can create a soft net pattern on the back of the hand and accent it with small dots or flowers at intersections.
Front Hand Henna for a Graceful Look
Front-hand designs often include the palm and fingers. For an easy style, focus on symmetry and clean spacing.
1. Simple Circular Palm Design
A small circle in the center of the palm surrounded by dots or tiny flowers looks neat and elegant.
2. Heart Motifs
Draw a heart in the middle of the palm with leafy patterns flowing outward a cute and romantic touch for special occasions.
3. Finger Focused Design
If you want minimal coverage, decorate only the fingers and leave the palm plain. This is a trendy and time-saving option.
Trendy Easy Hand Henna Ideas for 2025
Henna trends evolve every year. Here are some of the most popular easy hand henna ideas for 2025 that you’ll love to try:
1. Negative Space Art
Leaving blank areas between lines and shapes gives a modern, airy look. It makes your henna appear elegant and fashion-forward.
2. White Henna Designs
White henna (actually a temporary body paint) has become a stylish trend for photoshoots, parties, and summer looks.
3. Geometric Patterns
Combine triangles, diamonds, and straight lines for a contemporary style. This design looks especially chic on the back of the hand.
4. Tiny Dots and Minimal Lines
Minimalism is in! Small patterns with dots and thin lines create a subtle charm that’s perfect for casual events.
5. Glitter Henna
Add a touch of glam by sprinkling cosmetic glitter on wet henna. Once dry, it leaves a shiny, festive finish.
How to Apply Easy Hand Henna at Home
Applying henna is simple once you get the hang of it. Here’s a step-by-step guide to help you create your own easy hand henna designs:
Step 1: Prepare the Skin
Wash your hands with soap to remove oils and dirt. Dry thoroughly henna sticks best on clean skin.
Step 2: Make or Buy the Henna Cone
You can either make a paste using natural henna powder and essential oils or buy a ready-made cone from the market.
Step 3: Practice on Paper
Before applying directly to your hand, practice on a sheet of paper to control the cone’s pressure and flow.
Step 4: Start Simple
Begin with small motifs like flowers, dots, and lines. Gradually connect them to form a full pattern.
Step 5: Let It Dry
Leave the henna on for at least 2–4 hours. For a darker color, keep it overnight. Avoid moving your hands while it dries.
Step 6: Scrape It Off
Once dry, gently remove the henna using a spoon or tissue do not wash it with water immediately.
Step 7: Seal the Color
Apply a mixture of lemon juice and sugar or dab essential oil for deeper color. Avoid contact with water for at least 12 hours.
Tips for Long-Lasting Henna Stains
Everyone wants their henna to last longer and look darker. Follow these easy tips:
- Avoid washing your hands frequently for the first 24 hours.
- Keep your hands warm after applying henna heat helps deepen the stain.
- Moisturize daily using natural oils like coconut or olive oil.
- Avoid harsh soaps or detergents.
Easy Henna for Kids and Beginners
Henna is fun for all ages! For kids or first-timers, choose playful designs like hearts, smiley faces, or simple vines. Always use natural henna to avoid allergic reactions.
You can also try temporary tattoo stencils for perfectly shaped patterns. These are ideal for parties or quick designs without mess
Cultural Beauty and Modern Art Combined
Henna isn’t just decoration it’s a form of expression that bridges tradition and fashion. From ancient rituals to modern Instagram trends, easy hand henna has evolved into a universal art form.
Whether you prefer Arabic elegance, Indian detail, or minimalist Western styles, each design tells a unique story. And the best part? You can do it all with your own hands no professional needed!
Final Thoughts
Easy hand henna designs are the perfect balance between tradition and modernity. They are beautiful, effortless, and a creative way to add charm to your look. Whether you’re dressing up for an event or simply want to indulge in some self-care artistry, these designs will make your hands stand out gracefully.
So, grab your cone, let your imagination flow, and create your own version of beauty with easy hand henna.